Introduction
You crack open what you thought was a perfectly hard boiled egg, only to find a runny yolk staring back at you. Frustrating, right? Or maybe you’ve gone the opposite direction and ended up with that unfortunate gray-green ring around an overcooked yolk. Either way, figuring out exactly how long to hard boil eggs can feel like trying to solve a kitchen mystery.
Here’s the truth: hard boiling eggs isn’t complicated once you know the timing. The difference between a perfectly cooked egg with a creamy yellow yolk and a rubbery disaster often comes down to just a minute or two. Whether you’re meal prepping for the week, making deviled eggs for a gathering, or just want a protein-packed snack, getting your timing right makes all the difference.
In this guide, you’ll learn the exact timing for perfect hard boiled eggs. We’ll cover different methods, troubleshooting tips, and everything you need to know about storage and peeling. Let’s get those eggs cooked right.
The Standard Method: How Long to Hard Boil Eggs
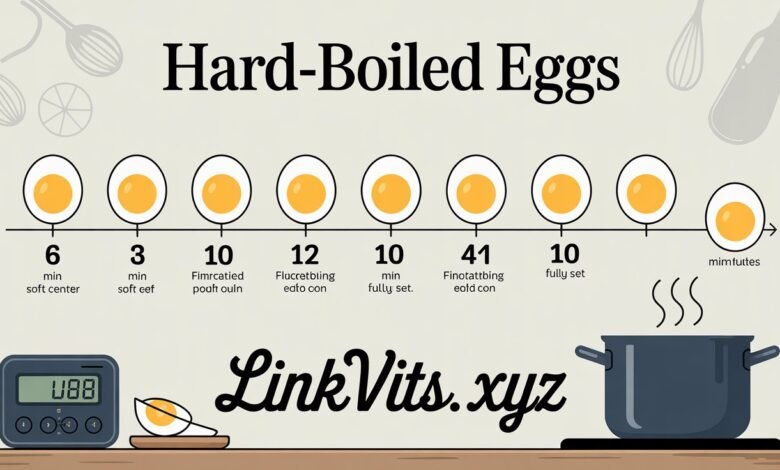
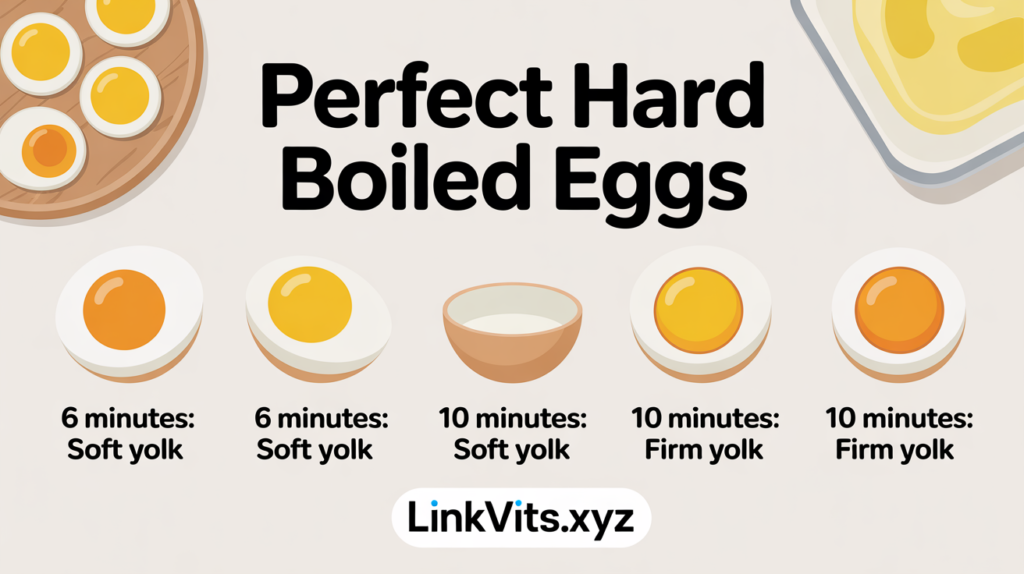
The most reliable way to hard boil eggs takes between 10 to 13 minutes. This timing applies when you’re using the cold water start method, which is what most people use at home.
Here’s how it works. Place your eggs in a single layer at the bottom of a pot. Cover them with cold water, about an inch above the eggs. Bring the water to a full rolling boil over high heat. Once you see those big bubbles breaking the surface, remove the pot from heat immediately. Cover it with a lid and let the eggs sit in the hot water.
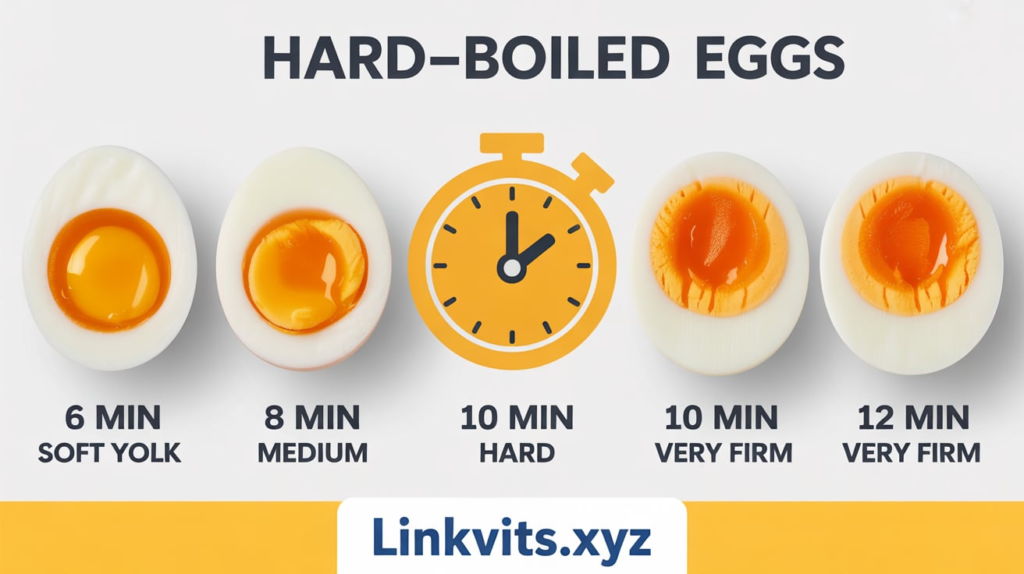
For a perfectly hard boiled egg with a fully set but still creamy yolk, let them sit for 10 to 12 minutes. If you prefer a firmer, more crumbly yolk, go for 13 minutes. Anything beyond 13 minutes risks that greenish ring around the yolk, which happens when the iron in the yolk reacts with sulfur in the white.
The beauty of this method is consistency. You’re not guessing or constantly checking. Set a timer, walk away, and come back to perfectly cooked eggs every single time.
The Boiling Water Method: A Faster Alternative
Some people prefer dropping eggs into already boiling water. This method actually gives you more control over timing and can make peeling easier.
Start by bringing a pot of water to a rolling boil. Gently lower your eggs into the water using a slotted spoon or ladle. This prevents cracking from the sudden temperature change. Once all the eggs are in, reduce the heat slightly to maintain a gentle boil.
Cook the eggs for exactly 11 to 13 minutes. Eleven minutes gives you a just-set yolk that’s still slightly soft in the very center. Twelve minutes produces a classic hard boiled texture. Thirteen minutes ensures the yolk is completely firm throughout.
I’ve found this method particularly useful when I need eggs to peel cleanly. The rapid temperature change seems to help the membrane separate from the white more easily. Just remember to prepare an ice bath before you start, because timing matters even more with this technique.
Why Timing Matters So Much
Every minute counts when you’re cooking eggs. The proteins in both the white and yolk continue cooking as long as they’re hot, which is why timing precision matters.
Undercooked eggs have whites that might still be slightly translucent or jiggly. The yolk remains liquid or jammy. While soft or medium boiled eggs have their place, they’re not what you want for egg salad or deviled eggs. They simply won’t hold up to chopping or mixing.
Overcooked eggs develop that gray-green ring around the yolk. This happens at temperatures above 170°F when the cooking time extends past 15 minutes. The eggs are still safe to eat, but the texture becomes chalky and rubbery. The whites get tough. The overall eating experience suffers significantly.
Perfect timing gives you whites that are fully set but still tender. The yolk cooks through completely while maintaining a creamy texture. The color stays a vibrant yellow. These eggs taste better, feel better in your mouth, and look more appealing on the plate.
Factors That Affect Cooking Time
Not all eggs cook at exactly the same rate. Several variables can influence how long to hard boil eggs in your specific situation.
Egg size makes a difference. Medium eggs cook faster than large eggs. Extra-large or jumbo eggs need additional time. If your recipe calls for large eggs but you’re using medium, reduce cooking time by about a minute. For jumbo eggs, add a minute or two.
Altitude affects boiling temperature. Water boils at lower temperatures in higher elevations. If you live above 3,000 feet, you might need to add a minute or two to standard cooking times. The lower boiling point means slower cooking overall.
Starting temperature matters too. Eggs straight from the refrigerator take slightly longer to cook than room temperature eggs. Most recipes assume cold eggs, but if you’ve left yours out, reduce the time by 30 seconds to a minute.
The number of eggs in your pot can change things. A dozen eggs will lower the water temperature more than just two or three eggs. If you’re cooking a large batch, you might need to add 30 seconds to ensure even cooking throughout.
The Ice Bath: Your Secret Weapon
Once your timer goes off, what you do next is just as important as the cooking itself. This is where the ice bath comes in, and it’s absolutely essential for perfect hard boiled eggs.
Prepare your ice bath before you even start cooking. Fill a large bowl with cold water and plenty of ice cubes. The water should be ice cold, with ice floating throughout. When your eggs finish cooking, use a slotted spoon to transfer them immediately into this ice bath.
Let the eggs sit in the ice water for at least 5 minutes. I usually go for 10 minutes to be safe. This rapid cooling serves several purposes. First, it stops the cooking process instantly, preventing that green ring. Second, it causes the egg to contract slightly inside the shell, making peeling significantly easier. Third, it brings the eggs to a safe handling temperature quickly.
Don’t skip this step thinking you’ll just run cold water over the eggs. That doesn’t cool them fast enough. The ice bath is what separates good hard boiled eggs from great ones. It’s a simple step that makes an enormous difference in your final result.
How to Peel Hard Boiled Eggs Easily
Even perfectly cooked eggs can be frustrating if they won’t peel cleanly. The key to easy peeling actually starts before you cook them.
Older eggs peel more easily than fresh eggs. The pH level in eggs changes as they age, causing the membrane to separate from the white more readily. If possible, use eggs that are at least a week old for hard boiling. I know this sounds counterintuitive, but it really works.
After your ice bath, gently tap the egg on a hard surface to crack the shell all over. Roll it gently between your hands to loosen the shell further. Start peeling from the wider end, where the air pocket sits. This gives you an easy entry point.
Peel under running water or in a bowl of water. The water helps separate the membrane from the white and washes away small shell pieces. Work slowly and patiently. If you rush, you’re more likely to tear chunks out of the white.
Some people add baking soda or vinegar to their cooking water, claiming it makes peeling easier. In my experience, the ice bath and using older eggs make far more difference than any additives.
Storing Your Hard Boiled Eggs
Properly cooked eggs need proper storage to stay fresh and safe. Hard boiled eggs can last up to one week in the refrigerator when stored correctly.
Keep them in their shells until you’re ready to eat them. The shell provides natural protection against bacteria and helps the egg retain moisture. Store them in a covered container in the main body of your refrigerator, not in the door where temperatures fluctuate.
If you’ve already peeled your eggs, store them in an airtight container with a damp paper towel. The moisture prevents them from drying out. Use peeled eggs within two to three days for best quality.
Mark your containers with the date you cooked them. It’s easy to lose track, and you don’t want to risk eating eggs that have been sitting too long. When in doubt, trust your nose. Bad eggs smell unmistakably sulfurous and unpleasant.
Never leave hard boiled eggs at room temperature for more than two hours. Bacteria can multiply quickly on perishable foods, and eggs are no exception. This applies to that egg salad at your picnic too.
Different Methods for Different Needs
Beyond the stovetop methods we’ve covered, you have other options for cooking hard boiled eggs. Each has advantages depending on your situation.
Instant Pot or pressure cooker: This method has gained serious popularity. Use the 5-5-5 method: 5 minutes high pressure, 5 minutes natural release, 5 minutes in ice bath. The eggs peel incredibly easily with this method. The timing stays consistent regardless of how many eggs you cook.
Oven baking: Place eggs directly on the oven rack at 325°F for 30 minutes, then ice bath. This works great for large batches. The eggs develop slightly different texture, and some people notice small brown spots on the shell, but they taste fine.
Steaming: Place eggs in a steamer basket over boiling water. Steam for 12 to 15 minutes, then ice bath. This method reportedly makes peeling even easier than boiling. The eggs cook more gently and evenly.
Air fryer: Cook at 250°F for 15 to 16 minutes, then ice bath. This relatively new method works surprisingly well for small batches. The cooking is very even, and cleanup is minimal.
Each method has devoted fans. The traditional boiling methods remain most popular because they don’t require special equipment. But if you already own an Instant Pot or air fryer, experimenting with these alternatives might change your egg-cooking game.
Common Mistakes to Avoid
Even knowing how long to hard boil eggs, certain mistakes can ruin your results. Let’s talk about what to avoid.
Don’t overcrowd your pot. Eggs need room to move slightly and cook evenly. If they’re packed too tightly, the ones in the middle might undercook while the outer ones overcook. Use a pot large enough that eggs can sit in a single layer comfortably.
Don’t start timing before the water boils. If you’re using the cold water method, your timer starts when you remove the pot from heat, not when you turn it on. Starting too early means undercooked eggs every time.
Don’t forget the ice bath. I’ve mentioned this already, but it bears repeating. Letting eggs cool gradually will give you that green ring around the yolk. It also makes them harder to peel and leaves them sitting in the danger zone temperature range longer.
Don’t use super fresh eggs if you want easy peeling. Save your farm-fresh eggs for frying or poaching. Use grocery store eggs that have been sitting for at least a week for hard boiling.
Don’t pierce the shells before cooking. Some old advice suggests this prevents cracking, but it actually increases the risk of whites leaking out. It also creates an entry point for bacteria. Just cook them whole.
Testing for Doneness
Sometimes you need to check if an egg is fully cooked without cutting it open. Here are reliable methods for testing doneness.
The spin test works great. Place the egg on a flat surface and spin it. A hard boiled egg spins smoothly and quickly. A raw or undercooked egg wobbles and spins slowly because the liquid inside shifts around. This test is surprisingly accurate.
You can also use a kitchen thermometer if you want to be absolutely certain. The center of a properly cooked hard boiled egg should reach 160°F. Insert an instant-read thermometer through the shell into the yolk center. This method works but requires piercing the shell.
The shake test is less reliable but can give you clues. Gently shake the egg near your ear. If you hear sloshing, it’s not fully cooked. A hard boiled egg should feel solid and silent.
When in doubt, cook one test egg and cut it open. This sacrificial egg tells you if your timing is right. Adjust your remaining eggs accordingly based on what you find inside.
Special Considerations for Meal Prep
Hard boiled eggs are meal prep champions. They’re portable, packed with protein, and versatile. But cooking them in bulk requires some special considerations.
When making large batches, cook eggs in multiple pots rather than overcrowding one huge pot. This ensures even cooking and makes handling easier. You can have two or three pots going simultaneously if you’re making several dozen eggs.
Stagger your batches if you’re limited on ice. You need enough ice bath capacity to cool eggs quickly. If your ice bath gets too warm from the first batch, refresh it with more ice before adding the second batch.
Label your batches clearly if you’re experimenting with timing. Maybe you want some at 10 minutes and others at 12 minutes for different uses. Mark the containers so you know which is which.
Consider your storage capacity before cooking too many at once. A dozen eggs take up significant refrigerator space. Plan your quantities based on what you’ll realistically eat within a week.
Using Hard Boiled Eggs in Recipes
Understanding how long to hard boil eggs becomes even more important when you’re using them in specific recipes. Different dishes have different texture requirements.
For egg salad, you want eggs cooked to the full 12 to 13 minutes. The yolks should be completely firm so they crumble easily when you chop them. Slightly soft yolks won’t mix properly with mayonnaise and other ingredients.
Deviled eggs also need fully cooked yolks. The filling should be smooth and creamy, which requires yolks that are firm enough to mash thoroughly but not overcooked and chalky. The 11 to 12 minute mark is usually perfect.
For slicing onto salads or grain bowls, any doneness from 10 to 13 minutes works. It’s really about personal preference. Some people love that barely creamy center, while others prefer a firmer texture.
For pickling eggs, go for the full 13 minutes. Pickled eggs need to hold their shape during the brining process. Softer eggs can become mushy after sitting in vinegar for days or weeks.
Nutrition and Safety Considerations
Hard boiled eggs are nutritional powerhouses, but safety matters when preparing and storing them. Let’s cover the important points.
One large hard boiled egg contains about 78 calories, 6 grams of protein, 5 grams of fat, and less than 1 gram of carbohydrate. They’re rich in vitamins B12 and D, selenium, and choline. The cooking method doesn’t significantly change the nutritional content.
Always cook eggs until both the white and yolk are firm to reduce the risk of salmonella. While rare, salmonella can occur in eggs. Proper cooking to 160°F throughout kills any potential bacteria.
Refrigerate hard boiled eggs within two hours of cooking. The danger zone for bacterial growth is between 40°F and 140°F. Eggs cool faster in ice baths, helping you get them safely refrigerated sooner.
Don’t eat eggs with cracked shells unless they cracked during cooking and you plan to eat them immediately. Cracks that occur during storage can allow bacteria to enter the egg.
People with egg allergies should obviously avoid hard boiled eggs entirely. The proteins that trigger allergic reactions remain present regardless of cooking method.
Troubleshooting Common Problems
Even with perfect timing, sometimes things go wrong. Here’s how to fix the most common hard boiled egg problems.
Eggs crack during cooking: This usually happens from temperature shock. Let cold eggs sit at room temperature for 10 minutes before cooking. Lower them gently into the water. Adding a tablespoon of vinegar to the cooking water can help the whites seal cracks quickly.
Green ring around the yolk: You overcooked them. Reduce your cooking time by a minute and make sure you’re using an ice bath immediately. The green color is harmless but indicates the egg spent too long at high temperature.
Impossible to peel eggs: Your eggs are too fresh. Try using eggs that are at least 7 to 10 days old. The boiling water method and ice bath also help. Some people swear by adding a teaspoon of baking soda to the cooking water.
Rubbery whites: Another sign of overcooking. Reduce your time and make sure you’re removing the pot from heat at the right moment. The whites should be firm but still tender.
Undercooked centers: Add a minute to your cooking time. Make sure your water is at a full rolling boil before you start timing. Consider if altitude or egg size might be factors.
Making Hard Boiled Eggs Work for Your Schedule
Hard boiled eggs fit into busy lives beautifully when you plan ahead. Here’s how to make them work for you.
Sunday meal prep works great for hard boiled eggs. Cook a batch on Sunday evening and you have quick protein for the entire week. Pack them with fruit for breakfast, slice them onto lunch salads, or eat them as afternoon snacks.
Keep cooked eggs readily visible in your refrigerator. I store mine in a clear container at eye level. If you can’t see them, you forget about them. Make them convenient and you’ll actually eat them.
Prep accompaniments at the same time. Chop some vegetables, portion out nuts, or prepare other snacks. Having complete snack combinations ready makes you more likely to reach for the healthy option.
If mornings are chaotic, peel a few eggs the night before. Store them in water in a covered container. In the morning, grab and go. This saves precious minutes when you’re rushing out the door.
For travel, hard boiled eggs in their shells are incredibly portable. They don’t need refrigeration for a few hours, making them perfect for road trips, flights, or days out. Just bring a small container for the shells.
Conclusion
Knowing how long to hard boil eggs transforms this simple task from guesswork into a reliable skill. Whether you use the cold water method with 10 to 13 minutes of sitting time or the boiling water method with 11 to 13 minutes of cooking time, consistency comes from following the process and timing carefully.
Remember the ice bath. Use older eggs for easier peeling. Store them properly to maximize freshness. Avoid the most common mistakes, and you’ll have perfect hard boiled eggs every single time.
The difference between mediocre and exceptional hard boiled eggs often comes down to just a minute or two. Now you have the knowledge to nail it every time. Your egg salad, deviled eggs, and quick protein snacks will thank you.
What’s your biggest challenge with hard boiling eggs? Have you found a method that works perfectly for you every time? The beauty of cooking is that we all develop our own techniques through practice and experience.
Frequently Asked Questions
How long should I boil eggs for hard boiled eggs? For the cold water method, bring eggs to a boil, remove from heat, and let sit covered for 10 to 13 minutes. For the boiling water method, cook for 11 to 13 minutes. Always finish with an ice bath.
Can you overcook hard boiled eggs? Yes, overcooking creates a gray-green ring around the yolk and makes the whites rubbery. Anything beyond 15 minutes is too long. Stick to 10 to 13 minutes for best results.
Why won’t my hard boiled eggs peel easily? Fresh eggs are harder to peel. Use eggs at least a week old. The ice bath helps too. Try the boiling water start method, which reportedly makes peeling easier.
How do you know when hard boiled eggs are done? Use the spin test: a fully cooked egg spins smoothly while an undercooked one wobbles. Or follow timing guidelines precisely and you won’t need to test.
How long do hard boiled eggs last in the refrigerator? Hard boiled eggs in their shells last up to one week refrigerated. Peeled eggs should be eaten within two to three days. Always store them in a covered container.
Should I add salt or vinegar to the water when boiling eggs? Vinegar can help seal cracks if they occur, but it doesn’t prevent them. Salt doesn’t affect cooking or peeling. Neither is necessary, though some people swear by adding baking soda for easier peeling.
Can I eat hard boiled eggs that were left out overnight? No, discard eggs left at room temperature for more than two hours. Bacteria can multiply quickly in the temperature danger zone. Food safety should always come first.
What causes the green ring around hard boiled egg yolks? This happens when eggs cook too long at high temperatures. The iron in the yolk reacts with sulfur in the white. It’s harmless but indicates overcooking. An ice bath and proper timing prevent it.
Is it better to start eggs in cold water or boiling water? Both methods work. Cold water start is more forgiving and traditional. Boiling water start gives more control and reportedly easier peeling. Choose based on your preference.
Can you reheat hard boiled eggs? Yes, but they’re best served cold or at room temperature. If reheating, do so gently to avoid rubbery texture. Microwave for 10 to 15 seconds maximum, or let them sit in warm water.
Also Read : Rush Hour 4